

Having the right equipment is a major component in making your brewing easier, allowing for more consistent results, and avoiding any unwanted spoilage. This does not mean that you absolutely must purchase the equipment listed below, but it is advisable to at least have the essentials. These can be purchased from your local Homebrew store (LHBS), or over the internet (check out the links to Homebrew suppliers on the GotMead main site).
The following points should be observed when selecting your equipment:
- Of key importance is to remember that everything must be sanitized. Wood, old buckets with scratches, chipped or cracked containers, all can harbor microorganisms that can be very difficult to get rid of.
- Take into consideration the ease of carrying stuff and how the size of the container will add to the weight. Note that a gallon of Must can weigh around 9 lbs, which will result in the average 5 gallon batch weighing around 50 lbs.
- Some people prefer to boil their Must, so any equipment must be able to withstand the temperature if this method is used.
- Finally, make sure that all containers used for fermenting or long-term storage (bulk aging) are made of food grade material. Glass is fine, but plastic buckets must be made of the correct material. Please read the Plastics information in Appendix 4 before selecting your container.
Primary Fermenters – A primary fermenter can be anything that will hold your liquid while it ferments without imparting any unwanted flavors or harmful chemicals. It must also be easy to clean and sanitize, large enough to hold the desired batch size, and constructed such that it can be sealed and fitted with an air-lock for closed fermentation. Glass and food-grade plastic are both excellent choices and are relatively easy to come by without spending too much money. Metal fermenters are also available, but they tend to be more expensive pieces of specialty equipment.
 The cheapest and easiest container to use is a 5 gallon plastic bucket. These are available at any Homebrew store and come with a gasketed lid that seals the Must away from the outside air. There is usually a hole cut in the lid for installation of a rubber bung with an air-lock, although it is possible to get a lid without the hole. Some pails even come with spouts installed near the bottom for racking without having to siphon. Food buckets from restaurants can be used, although they sometimes have a remnant of the original content’s smell that will infuse into your Mead (see Appendix 4 for tips on removing this odor). If you choose to do open style fermentation, the bucket can be covered with a garbage bag or sheet rather than with the lid and air-lock.
 5 gallon glass Carboys and 1 gallon glass jugs are also very popular as fermenters. They are easy to clean, easy to seal with a bung and air-lock, and are non-reactive to any ingredient you put into the Must. They also have the added advantage of being clear so that you can watch the progress of the fermentation. Juice or wine jugs are perfect for use as a fermenter and are cheap and easy to find.
Secondary Fermenter – After the first couple of weeks of fermentation, the activity level of the must drops off and you can siphon into a secondary fermenter. The Secondary fermenter is most often a glass Carboy but can also be a 5 gallon bucket.
Siphon Hose – Used to transfer the Mead from the Primary fermenter to the Secondary fermenter (a process known as Racking), or into the bottles for storage. The hose should be clear, flexible, food-grade vinyl tubing, 5/16 inches in diameter, and about 6 feet long. Siphon hose is available at any Homebrew store and some kitchen supply stores. If you are buying it from a hardware store, make sure it is food-grade vinyl.
 Airlock – A simple device that allows carbon dioxide inside the fermenter to escape, without letting the contaminated air in. They come in two types, the Three Piece and the S-Bend. Either is good, although the three piece is easier to clean.
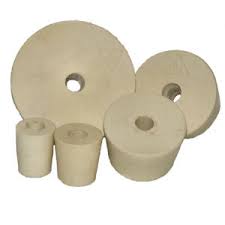 Rubber Stoppers – These rubber bungs come in different sizes to fit the different neck sizes of the fermenters. They can be purchased drilled or undrilled depending on the final use. If they are for use with an airlock, make sure they are drilled when you buy them, as they are fiendishly difficult to drill yourself. Size 6.5 will fit a 3, 5 or 6.5 gallon carboy, size 5.5 will fit a 4 litre wine jug, and size 2 will fit the hole in the lid of 5 gallon plastic fermenter.
Long Handled Spoon – Although not a necessity if using carboys or jugs, having a long handled spoon is necessary if you are mixing your must in the 5 gallon pail or heating it on the stove in a pot. The handle must be long enough to reach the bottom of the container while still allowing you to get a good grip and avoid contaminating the Must. Metal or plastic is ideal not only for their ease of sanitation, but because of their strength.
Alternatively, you can use a stirring rod with an electric drill, a great way to whiz up your must quickly.
Sanitizer – There are various types of sanitizer that can be used and will be covered in Chapter 8. Make sure you have sufficient amounts of it before starting any work on the Mead.
Bottles – There is no set rule as to what type of bottle to use to store your Mead. You can re-use wine bottles, beer bottles or glass drink bottles, properly sanitized. You can get bottles from your homebrew shop or friends, or a local bar or restaurant.
The three main questions that you should ask yourself before choosing the bottle type are: what type of Mead is it, how do you intend to store it, and how do you like to drink it? Each answer will lead you to a specific bottle.
- What type of Mead is it? – If it is a still Mead, you can use any type of bottle, but if it is a sparkling Mead, then you will need to select a bottle that can withstand the pressure. Beer bottles or Champagne bottles work well.
- How do you intend to store it? – Over time, light exposure will affect the flavor of your Mead in a negative way. Therefore, if you are going to store your Mead in a lit area, you should use a green or brown bottle. If you have a dark space, then you can select a clear bottle instead. For long term storage, corked or capped bottles are best, although the Grolsch type flip-top bottles also work well. Screw top wine bottles work fine as well, but do not use screw-off beer bottles, as these require a special tool to seal the cap properly.
- How do you like to drink it? – Mead can be as strong or stronger than most commercial wines, or as low as 5% (known as hydromel or session mead). If you are the type of person who likes downing a whole bottle at a sitting, or you drink it with other people, then a wine bottle size will be best. If you prefer to drink small quantities at a time, you might want to select beer bottles instead. Of course you can also mix and match sizes for any occasion.
Corks and Caps – Corks can be purchased in multiple forms, natural, composite or plastic. All have merit, and seal the bottles well. Make sure that the correct size is selected for the bottle being used (#9 is standard) and that they are sanitized before insertion.
Caps are fairly standard and can be purchased from any Homebrew store. Note that you should not try to use caps on twist-off bottles as they will not seat properly and you could end up with some nasty oxidized Mead.
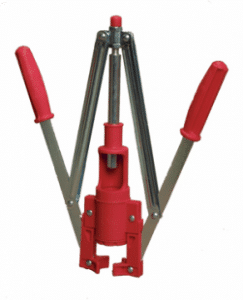
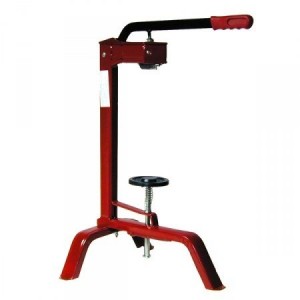 Corkers and Cappers – Both Corkers and Cappers come in two forms, each designed for ease of use. The Corker comes in the wing model, table top model and the floor model. The wing model is cheap (retails at around $22-25) and convenient to store and carry, but it can be a little difficult to work with (you want to be careful not to break the bottle neck). The table top model works very well and requires only one person, but it is bulky and costs a little more (roughly $65-70). The floor corker is the most stable, and also the most expensive at just over $100.
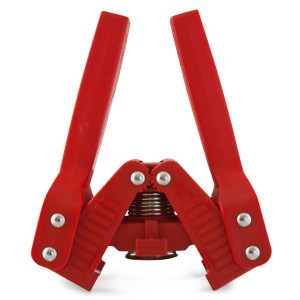
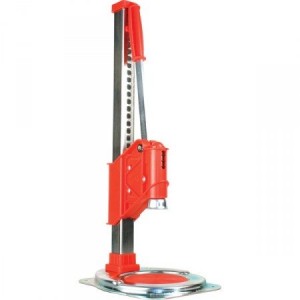 The Cappers come in the Two-handled and Bench models. Both are easy to use, and not too expensive (roughly $13-17 for the Two-handled and $40-60 for the Bench). The bench model is a little quicker and allows the user to hold the bottle while capping.
If you have a Homebrew Store near you, they might rent any of the Corkers or Cappers for a small fee per day. Rather than spend money on equipment you may not use that often, it may be an option to just rent it when bottling your Mead.
Bottle Brushes – They come in different sizes for the different bottle and carboy sizes. They also come straight or angled to help reach the out of the way spots around the top.
Brew Pot – If you choose to heat the water (Gotmead recommends no boiling!, but warm water can help melt a crystallized honey), all that is needed is a pot that is large enough to hold at least half of the total liquid that will be used in the batch. It should have a heavy base and handles for easy lifting and pouring. Stainless steel is preferable, although any metal pot will work except for aluminum which will react the Must.
Thermometer – Necessary if you are boiling or pasteurizing your Must to make sure the temperature has dropped enough to pitch the yeast. Just about any thermometer will do, just make sure that you do not break it in the Must as the mercury will ruin a whole batch.
 Racking cane – This is a rigid tube that fits down into the carboy. It connects to the siphon hose, and allows you to more easily siphon off the clear mead and leave the Lees (dead or dormant yeast) behind. They come with plastic caps on the bottom to keep the end of the tube out of the Lees. A racking cane is not a necessity as you can siphon the Mead using just the tube, but it does make it a lot easier to avoid transferring the any unwanted sediment.
 Bottle Filler or Bottling Cane – A Bottle Filler is a small tube that fits onto the end of the siphon hose to aide in filling of the bottles. It has a shut off valve at the end that starts the flow of Mead when the tube is inserted into a bottle. Two types of valves are available: spring or gravity actuated. Once the liquid reaches the lip of the bottle, the tube is lifted off the bottom and the flow of Mead stops. The Mead level will drop as the tube is removed, leaving the perfect headroom for corking or capping. Both types work well, although the spring one seems to prevent dripping better than the gravity version.
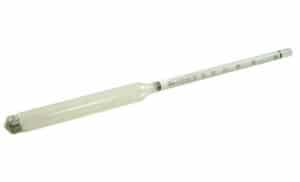 Hydrometer – A special glass float, weighted at the large end, that is used to measure the density of the Must and Mead to determine the alcohol content. The more sugar there is, the denser the liquid and the higher the hydrometer will float. When the sugar is converted into alcohol, the density decreases and the float drops further into the liquid. They usually have three scales that measure the Specific Gravity from 0.990 to 1.170, Potential Alcohol content, and the Oechsle scale. They come in small tubes to hold the sample, although they can be floated in the open fermenter as long as they have been properly sanitized. Make sure the one you buy is not specifically made for beer, and follow the directions provided for calibration. If you like, you can get a hydrometer kit, or also purchase a hydrometer jar to use in checking your specific gravity. See Appendix 9 for instructions on how to read a hydrometer.
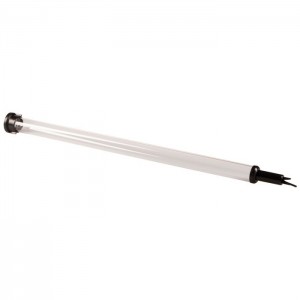 Wine Thief – There are times when you will need (or want) to take a sample of the Mead to test for alcohol content or to taste. To do this, you will need some sort of tube that will withdraw enough liquid to fill the Hydrometer tube. A simple Turkey Baster (sanitized and *not* used with meats!) works well for this and is easy to find. There is also a special tube called a Wine Thief that is available at any Homebrew store. This tube has a valve at the bottom that allows the tube to fill up as it is inserted into the Mead, and then closes as the tube is removed, taking with it enough of a sample to test.
Additional equipment that is nice to have, but not essential, can be found in Appendix 3.
Copyright 2006-2020 GotMead.com – Please do not copy, download, reproduce or distribute without written permission from GotMead.

She is also an experienced marketing coach and consultant who has recently decided to focus her marketing expertise exclusively on the craft beverage market to help meaderies, cideries, breweries and distilleries expand their business and get more customers while doing what they love.
- 4-9-24 Bryce and Savannah at Fox and Raven Meadery - April 9, 2024
- 3-26-24 Bray Denard – One Month Mead, Mead - March 26, 2024
- 3-12-24 Laura Angotti – Mead in History and Historical Mead Making - March 12, 2024